How to connect a piezoelectric speaker to a micro:bit?
In this video, our expert walks you through setting up the connection between your micro:bit and the piezoelectric speaker, which will create a sound output based on the previously generated code. This step is possible if your micro:bit has already received code for this purpose. To find out more about how to download your code from MakeCode to your micro:bit, check out our video and dedicated article!
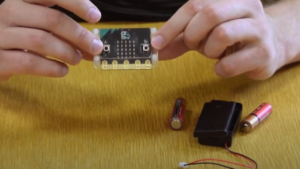
Once you’ve downloaded the code to the micro:bit and hooked it up to the batteries, you can immediately switch on the batteries as follows, using the on/off switch. Then you’ll notice that when you press the “A” button on your micro:bit, it emits light but no sound, which is quite normal given that we need to connect it to the speaker.
The speaker in this case is called a piezo, and we’re going to connect them together using the alligator clips.
To start with, we’ll use the first black alligator clip tip and connect it to the “GND” pin. We’ll connect the other black clip tip to the stripped part of the speaker’s black wire. Be careful not to accidentally pinch the plastic, but the metal part of the cable.
Then use the red clamp and connect it to the “0” pin at the other end, and connect the other side of the red clamp to the red metal wire of the speaker, avoiding the plastic sheath.
Following these steps, when the “A” is pressed, the micro:bit should emit a sound.
We can then make short signals, and long ones, which will be very useful for the challenges included in our educational courses!
- 9 February, 2024
Subscribe to the newsletter
Keep up to date with the
techno-educational news!
Our other micro:bit videos...


Would you like to find out more?
Book a call with our team!
We’ll help you discover our products and installations, and set them up in your classroom.
Explore our complete offer !
Discover all our educational and techno-creative kits, as well as our workshop and training offers, in our online store.